Are you also the one who uses Google Browser the most in your system? If yes, why not use the Chrome OS itself to browse and do your online work, and even with Google Play Store support. Windows 10 has a ton of features but most of the users don’t use them. So, why use that bulky OS in our machine. Chrome OS is the ultimate solution to use the required features. The best part is that you will continue to receive updates directly from Google and the fun thing is that you will be able to use Google Play Store to download your favorite apps. In this article, we are going to discuss each, and every step involved to install Chrome OS on any Laptop/Desktop using very straightforward steps.
What is Chrome OS?
According to Wikipedia, “Chrome OS is a Gentoo Linux–based operating system designed by Google. It is derived from the free software Chromium OS and uses the Google Chrome web browser as its principal user interface. However, Chrome OS is proprietary software,“
Features of Chrome OS
100% Cloud/Web-based system,Works on low-end systems as well,Chrome OS is and will be open-source and free,Supports Google Assistant perfectly,You can create multiple virtual workspaces,Up to date with the latest OS versions,PIN as well as password for better security,Night as well as reading mode,Every Chrome feature is available in Chrome OS.
Install Chrome OS on any Laptop/Desktop
Step 1: Preparing Installation Media
Insert a flash drive, at least 16 GB.Now, open Rufus, in order to create bootable media for Linux Mint.Make sure to keep all the default settings as it is.Now, click on the Start button and wait for a while to finish.
After completion, Rufus will ask you to restart the PC, but don’t restart, we have a few more steps to do.
Since we have created the bootable media, now it’s time to organize all Chrome OS files in one place. Before starting the installation process, please have a look at the new Chrome OS Flex. Google announced a new version of Chrome OS specifically for old Windows, Linux, and Mac hardware. That means you will be able to install and run Chrome OS on your system officially.
USB Flash Drive, at least 16 GBA system with an Intel-based CPUMotherboard with UEFI boot modeA system with internet connectivity
Linux Mint or any Linux for Live Boot (Download)Chrome OS Files (Navigate to ‘rammus’ and download recovery latest build available) Rufus (Download)Brunch Files (Download the latest build)install.sh File (Download)
First, open the Brunch (.tar.gz) file using any tool like WinRAR and extract it in some safe place so that we can use them in upcoming steps. There will be four files named chromos-install.sh, efi_legacy, efi_secure, and rootc.
Now, open the Chrome OS (.zip) file and extract it somewhere safe. And then rename the file to rammus_recovery.bin, (make sure to rename).
Now, finally, create a folder in the same flash drive (maybe named Chrome OS) and then copy those four files from the brunch folder (chromos-install.sh, efi_legacy, efi_secure, and rootc), the Chrome OS recovery file (rammus_recovery.bin), and the install.sh file.
Congrats, you are done with the step 1, now proceed to step 2.
Step 2: Booting Linux Mint
Now, it’s time to live boot into Linux Mint to start the installation process. First, we will have to open laptop’s BIOS to cross-check the boot method, to do so, follow the below steps properly,
Restart your PC, and while booting, before the Windows logo, tap the BIOS key to open it.
As soon as you enter the BIOS, navigate to the Boot section.
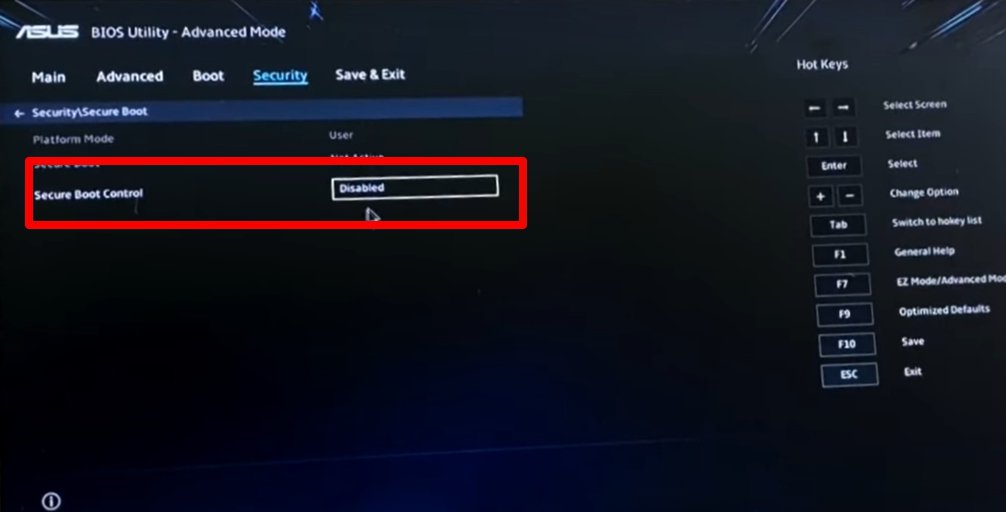
Then disable Secure Boot and change the boot option to UEFI mode.
Now, plug in the flash drive and Save and Exit BIOS.Now, again, while booting, press the Boot Menu key,
You see a screen with a list of drives, choose the one you inserted/plugged in, and hit Enter.It will now redirect you to a Linux Mint boot menu, choose Start Linux Mint 19.3 Cinnamon 64-bit.
Finally, you will be booted into the Linux Mint demo environment.
Step 3: Chrome OS Installation
You have done all the tough parts, we will just use the Linux Mint terminal to install the Chrome OS, follow the below steps to do so,
First thing, check whether your Wi-Fi is working or not, as we will need the internet connection for installing a few dependencies while the Chrome OS installations, To do so, tap on the Wi-Fi icon which is located at the right-bottom side of your Linux Mint desktop.Now, open file manager, and go to File System and search for the folder which we created and copied to flash/pen drive earlier.
Now, open that folder and cross-check all the six files (chromos-install.sh, efi_legacy, efi_secure, and rootc, rammus_recovery.bin, install.sh).
After cross-checking the files, right-click anywhere in the empty space, and click the Open in Terminal option.After opening the terminal, use the below command to start the installation,
After a while, it will ask you to give your permission to wipe the hard drive. To proceed, write Yes, and hit Enter.In a couple of minutes depending on your internet speed, the installation will be completed.Now, finally, open the start menu of Linux Mint located at the bottom-left corner and click on the “Turn off” button.
Finally, remove the flash/pen drive and Turn ON your PC, this time it will boot into the Chrome OS start screen.
Final Verdict
We hope you were successfully able to follow and install Chrome OS on your Laptop/Desktop and now using it perfectly. If you have any doubts or are stuck in any step, then make sure you comment down below. Peace.