Along the same lines, it is equally impressive in custom development. Once you unlock the device’s bootloader, you stand in the position to try out a plethora of customizations. These include the likes of flashing custom ROMs, recoveries, and modules such as Xposed Framework, Viper4Androd, Substratum Themes, etc. However, this is just one aide of the coin. On the flip side, these tweaks do bring in quite a few risks as well. If you don’t end up performing the tweaks correctly, then a soft brick or bootloop device is on the cards. Fortunately, there’s an easy way out. You could unbrick your Redmi K20/Pro via Fastboot Commands. And in this guide, we will show you how to do just that. So without further ado, let’s get started.
How to Unbrick Redmi K20/Pro via Fastboot Commands
The below instructions are listed under separate sections for ease of understanding. Make sure to follow in the exact same sequence as mentioned. Droidwin and its members wouldn’t be held responsible in case of a thermonuclear war, your alarm doesn’t wake you up, or if anything happens to your device and data by performing the below steps.
Download Patched Firehose File (prog_emmc_firehose.mbn) for 600+ Android DevicesUnbrick Redmi Note 7 | Note 8 | Note 9 Series: The Fix?Fix Mi Account Authorization | Unbrick Xiaomi | EDL ModeHow to Bypass Xiaomi Account Verification via Mi Unlock Tool
STEP 1: Install Android SDK
First and foremost, you will have to install the Android SDK Platform Tools on your PC. This is the official ADB and Fastboot binary provided by Google and is the only recommended one. So download it and then extract it to any convenient location on your PC. Doing so will give you the platform-tools folder, which will be used throughout this guide.
STEP 2: Download Redmi K20/Pro Fastboot ROM
Next up, download the Fastboot ROM for your device. As for this guide, I am using the following ROM file: Redmi K20 India V12.0.8.0.QFJINXM Fastboot ROM. You are free to try any version of your choice, but it is recommended to try the newer builds only and of your region. Here is how to understand the Xiaomi Fastboot firmware version: [Don’t Miss: How to Flash Xiaomi Fastboot ROM without Mi Flash Tool].
12.0.8.0 – Firmware versionQ – Android version (Q-> Android 10).FJ – Smartphone model code (FJ = Redmi K20)IN – Firmware build type (IN for India | MI for Global | EU for Europe)XM – Firmware version code
Now that you have got hold of the required firmware file, proceed ahead to the next step to unbrick Redmi K20 via Fastboot Commands.
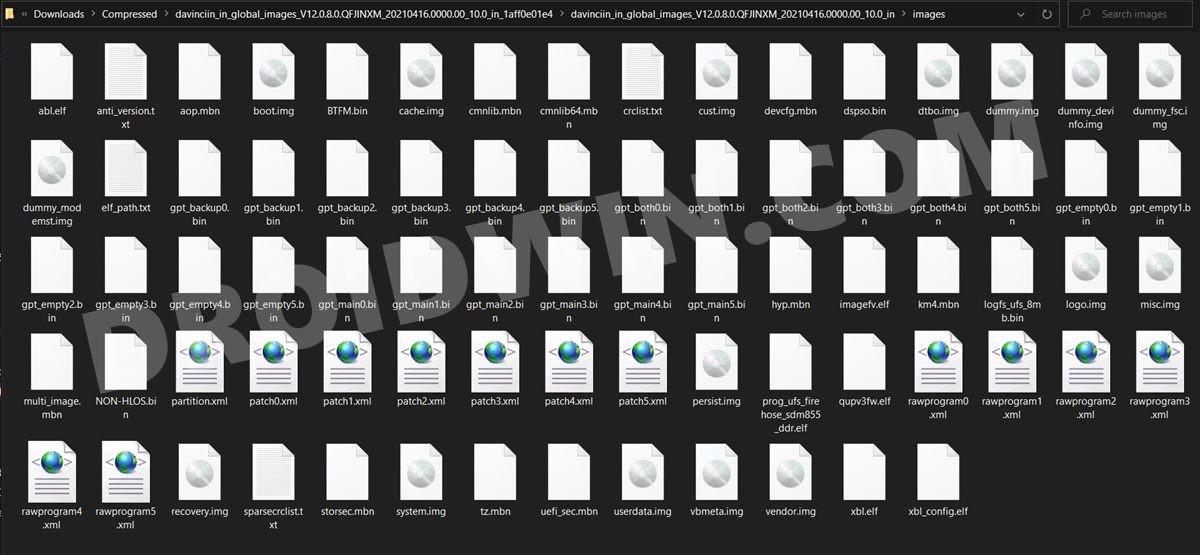
STEP 3: Move Redmi K20/Pro Fastboot ROM Files to ADB Folder
STEP 4: Boot Bootloop/Soft Bricked Redmi K20/Pro to Fastboot Mode
STEP 5: Unbrick Redmi K20/Pro via Fastboot Commands
Finally, we are down to the most important part of this article. I have shared all the required fastboot commands to flash the stock firmware onto your Redmi K20 and unbrick it. To begin with, make sure that your device is connected to the PC via USB in Fastboot Mode. Then head over to the Command Prompt window that is opened inside the platform-tools folder.
Now execute the below commands in this CMD window. I would highly recommend that you execute these commands one at a time, rather than copy-pasting all of them in one go [Commands are the same for both K20/Pro devices since they follow the same partition scheme]. Once you have successfully executed all the above commands, your device will reboot to the OS. On that note, we conclude the guide on how to unbrick Redmi K20/Pro via Fastboot Commands. The best part about this tutorial is the fact that it doesn’t require any Redmi K20 Patched Firehose File (prog_emmc_firehose.mbn) or the prog_firehose_ddr_unbrick.elf file. Furthermore, we didn’t need to make use of the Mi Flash Tool either. With that said, if you have any queries concerning the aforementioned steps, do let us know in the comments section below. We will get back to you with a solution at the earliest.
How to Boot any (Bricked/Unbricked) Android Device to EDL ModeRoot Android 11 via Magisk Patched boot.img (without TWRP)Fix Magisk patched boot.img issue while Rooting Android 11How to Pass Magisk SafetyNet on Rooted Android 11
About Chief Editor


