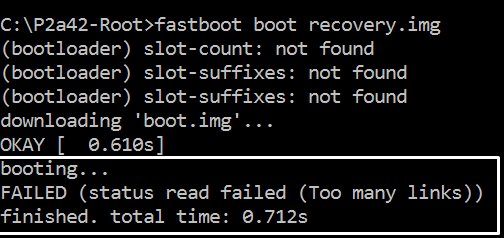
Along the same lines, you could also root your device, via TWRP or by patching the stock boot.img file and then flash it via Fastboot Commands. However, while executing all these steps, a few issues are imminent. In this regard, the FAILED (status read failed (Too many links)) error seems to be among the oldest as well as the most frequently occurring ones. So whereas there are a few errors that come with a well-defined error message, unfortunately, this one doesn’t belong to this category. The status lead failed and too many links don’t help the end-user in understanding the underlying error. But fret not. If you are facing this issue, then this guide is here to help you out. Today we will list out various methods to fix this issue once and for all. Follow along.
Fix error boot prepare- device stuck in fastbootFix Android stuck in Recovery Mode: No Command screenDetailed Steps to Fix adb is not recognized ErrorHow to Fix FAILED (remote: unknown command) Error
The Reason for FAILED (status read failed (Too many links))
More often than not, the issue seems to occur while flashing a custom recovery such as TWRP. In that case, you may get an error message along the following lines: Likewise, it could also take the shape of the following message: One thing evident from the above two cases is the fact that it isn’t related to A/B partition devices only. This is because in the first instance, the user has an A partition device as he is flashing the recovery to the recovery partition. Then in the second instance, the user has an A/B partition device- since he/she is sending the twrp image to the boot partition (A/B devices don’t have a dedicated recovery partition, all is taken care of by the boot partition).
Furthermore, most of the time this issue occurs while booting/flashing a custom recovery. In some rare cases, it might be due to the execution of some other ADB and Fastboot commands or flashing custom binaries. With this, you might have got a perfect knowledge behind the reason for this error, let’s now turn our attention towards the more important part- how to rectify it. Well, here are the different methods that will help you fix the FAILED (status read failed (Too many links)) issue. Follow along.
Fix Magisk patched boot.img issue while Rooting Android 11Fix: pip is not recognized as an internal or external commandHow to Update Magisk ZIP and Magisk Manager (without TWRP)Fix Magisk Module Bootloop without TWRP Recovery
How to Fix FAILED (status read failed (Too many links))
There isn’t any universal fix for the aforementioned issue. You will have to try out all the below mentioned workarounds until you are able to achieve success. We will start off with some basic fixes followed by the advanced ones. Fortunately, in this case, the basic fix should do its job more often than not.
Fix 1: Change USB Cable
The most common cause for this error is using an old, unofficial, or teared up USB cable. Therefore, we would request you to switch over to the official USB cable and retry with the steps. On the other hand, some users were facing the issue with the official USB cable itself. Hence they switched over to another cable and the error was fixed. So to summarize this fix you should try using a different USB cable and this might fix the FAILED (status read failed (Too many links)) issue.
Fix 2: Use USB 2.0 Ports
USB 3.0 Ports are known to give out too many issues. In most instances, they break down the ADB or Fastboot communication between your device and PC. Therefore, we would suggest you switch over to the USB 2.0 ports and carry out the desired task. Check if it fixes the FAILED (status read failed (Too many links)) issue.
Fix 3: Use the Google ADB Drivers
Well, as of now there are a plethora of ADB and Fastboot tools available across the web. However, just to claim that they are among the smallest in size, they tend to compromise on the performance front. As a result, they leave out a few important files. Hence we would suggest you don’t install any such tools but rather stick with the one provided by Google. Here is the link for the same: Download Google’s Android SDK Platform Tools.
How to Install OxygenOS OTA on Rooted OnePlus devicesDownload Stable Android 11 OxygenOS 11 for OnePlus 8/ 8 ProHow to Extract Stock Boot.img from OnePlus OxygenOS Stock ROMFix Sahara communication failed error in MSM Download Tool
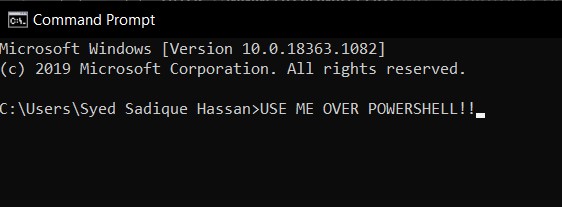
Fix 4: Use CMD over PowerShell
I personally keep a safe distance from PowerShell and always stick with Comand Prompt. The reason being the fact that the former makes the matter more complicated than it should have been. For example, you might have to use a period and forward slash before executing any ADB and Fastboot command. Not doing so throws up an error or two. So it’s always good to use the Command prompt window only.
Fix 5: Launch CMD inside ADB Directory
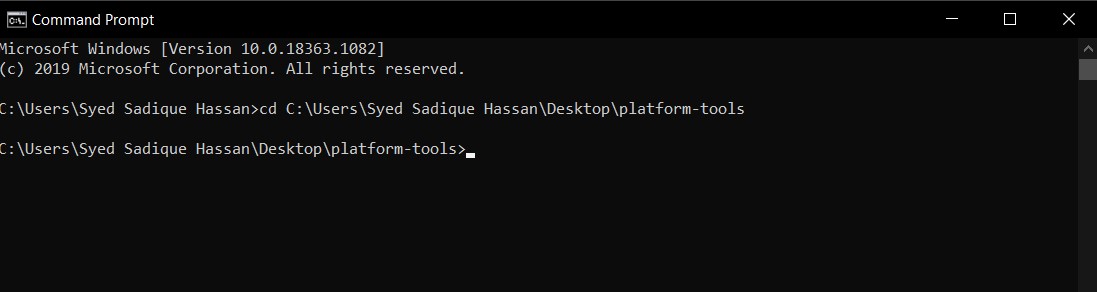
Another pretty important point worth discussing is that you should always launch the Command Prompt inside the directory where the ADB and Fastboot binaries are present. Upon installing the Android SDK Platform Tools, you will get the platform-tools folder. And you should always launch the CMD window inside that directory only. There are two different methods for the same, let’s check them out: The shorter method: Just head over to the platform-tools folder, type in CMD in the address bar, and hit Enter. This will launch the Command Prompt inside the ADB directory itself.
The longer method: This involves manually instructing the Command prompt to head over to the ADB directory. So search for CMD from the Start menu. Then type in CD followed by the installation directory of the platform-tools folder.
Fix 6: Re-Verify the Files
First off, make sure that the file that you are about to flash is built for your specific device only, and not for its Mini, Pro, Ultra, Max, or Plus variants!Furthermore, all the files that you need to flash should be placed inside the platform-tools folder. This is the folder where all the Fastboot and ADB files are present.Likewise, make sure that you have named these files correctly. Most instructions across the web would list out the commands such as fastboot boot twrp.img or fastboot flash recovery twrp.img. However, when you download the file, it wouldn’t be simply named as twrp. Rather, apart from the twrp keyword, it would also have the version number and device code with itself.So it is recommended that you rename the recovery to twrp and then execute the above command. Or you could keep the name as it and then modify the command accordingly. Talking about the commands, this brings us to our next fix for the FAILED (status read failed (Too many links)) issue.
[GUIDE] Flash ROMs/Magisk/TWRP/Kernels on A/B Partition DevicesEverything About Magisk- Manager, Modules and MoreBest Magisk Modules of 2020 [PART-1]Fix Magisk Module Bootloop without TWRP Recovery
Fix 7: Check device is A/B partition or Single-A partition
As already mentioned, A/B devices don’t have the recovery partition and hence you cannot directly flash TWRP inside it. You will have to make use of the boot partition to boot up the recovery as a temporary installation and then permanently flash it right from TWRP itself. On the other hand, single partition devices still have the recovery partition and they could directly flash TWRP. In short, here’s what needs to be done:
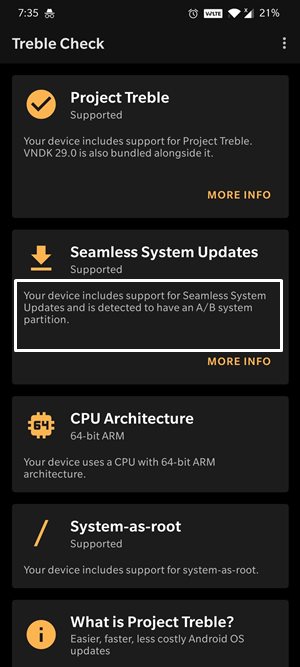
Verify if your device is A/B or A Slot:
The easiest way of doing so is to download the Treble Check – Treble Compatibility Checking App from Play Store. Then launch the app and verify the number of slots for your device.
If A/B Device
If your device comes out to be an A/B partition, then you will have to use the following command: Once booted to TWRP, you could then flash the TWRP ZIP for the permanent installation.
If A only Device
if your device just has a single slot, then you could directly flash it as follows: In both these cases, make sure that you have renamed the recovery to twrp, transferred it to the platform-tools folder and the command is being executed right from the CMD window that has been launched inside the platform-tools folder only. Keep these points in mind and see if the FAILED (status read failed (Too many links)) issue has been fixed or not.
How to Fix TWRP Error 70 [With Screenshots]How to Fix TWRP Error 20 GApps after flashing LineageOSFix TWRP Error 7 (While Flashing Custom ROM via TWRP)How to Boot into Recovery (TWRP/Stock) from Fastboot Mode
Fix 8: Restart, But After a Pause
Well, I can’t really explain the logical explanation behind this fix, but in my 8+ years of custom development experiences, there have been a few instances where a complete restart of the entire process was able to fix the underlying issue. As far as this issue is concerned, completely shut down the PC. Likewise, then turn off your device and keep it in that mode for around 5 mins. Then power both the devices on. With this, we conclude the guide on how to fix the FAILED (status read failed (Too many links)) issue. We have shared eight different fixes for the same, any one or a combination of two or more should work out for you. Do let us know in the comments which of the above-listed methods spelled out success in your case.
Bypass New Google Restriction: Get Free Unlimited Photos StorageHow to Restore an Old WhatsApp Chats BackupAll Your Google Photos Album are Public by Default. Here’s how to fix it!Use WhatsApp Entirely (Messages, Audio, Video Calls) in Handsfree Mode
About Chief Editor