Likewise, you could also hide root from various banking apps or pass SafetyNet on rooted devices. Moreover, it also gets regularly updated with the addition of useful functionalities and fixing of underlying bugs. And as of now, it has been bumped up to version 22, with probably the biggest change to date. In this guide, we will be discussing more on these changes. Furthermore, we will also show you the steps to download and install (or update) the latest Magisk v22. Let’s get started.
Pass SafetyNet test after installing Xposed or EdXposedHow to Pass Magisk SafetyNet on Rooted Android 11How to use Core Only Mode in the new Magisk Manager?Fix ctsProfile Mismatch Error on Rooted Android
What’s New in Magisk v22
Here are some of the noteworthy features that deserve your attention. I have also listed out their explanations as well.
Magisk App is now a Merger of Magisk ZIP and Magisk Manager APK
While going through the update changelog, there was one listing that caught my eyes: “Magisk and Magisk Manager is now merged into the same package!”. So what does it mean? For the unaware, till now there was two standalone Magisk package, one was the Magisk Installer ZIP while the second one was the Magisk Manager APK. The first one (ZIP) was flashed via TWRP to obtain root. After this, you had to install the Magisk Manager app to manage root on your devices. These included the likes of flashing modules, hiding roots, among others. However, this has always lead to a little confusion (especially to the users who are new to this scene) as to which file they should ultimately install. Now with both of the builds getting merged, this doubt might finally be put to rest.
Magisk Manager will now be known as Magisk App
Then the next changelog speaks that The term “Magisk Manager” is no longer used elsewhere. We refer to it as the Magisk app”. It only made sense, since both of them have been build into a single package. So from now on, you wouldn’t the Magisk Manager term used, rather the Magisk App is the only thing that you would need. Inside this ‘App’, you would get all the packages: the earlier magisk manager app, the Magisk Installer ZIP, as well as the Magisk Uninstaller.
Hide Root on Android 5.0+
Next up is the “Support hiding the Magisk app with advanced technique (stub APK loading) on Android 5.0+”. Up until now, the Magisk Hide functionality was supported on Android Pie 9.0 and above devices. But with Magisk v22.0, the support has been further expanded ranging way back to Android 5.0 Lolipop+.
Root Support for Galaxy S21 series
Furthermore, the update also brings in good news for the Samsung flagship device owners: “[MagiskInit] Support Galaxy S21 series”. Up until now, you had to change the Magisk channel to the Canary build and could then only patch the AP tar file and flash it via Odin to root your Galaxy S21 series. But with the Magisk v22, you could now use the Magisk Stable build as well. Here are all the required instructions for the same: Root Samsung Galaxy S21, S21 Plus, and S21 Ultra via Magisk.
Other Changes
Here are some other technical changes that you should get aware of:
[App] Disallow re-packaging the Magisk app on devices lower than Android 5.0[App] Detect and warn about multiple invalid states and provide instructions on how to resolve it[MagiskHide] Fix a bug when stopping MagiskHide does not take effect[MagiskBoot] Fix bug when unpacking lz4_lg compressed boot images[MagiskSU] Fix incorrect APEX paths that caused libsqlite.so fail to load
Download Magisk V22.0
Before we list out the steps to install or update the latest Magisk v22, you should first download this build onto your device. As before, the entire credit goes to XDA Senior Recognized Developer topjohnwu for this build as well.
Download Magisk v22.0: Magisk-v22.0.apk [Source: GitHub]
How to Install Magisk v22 APK?
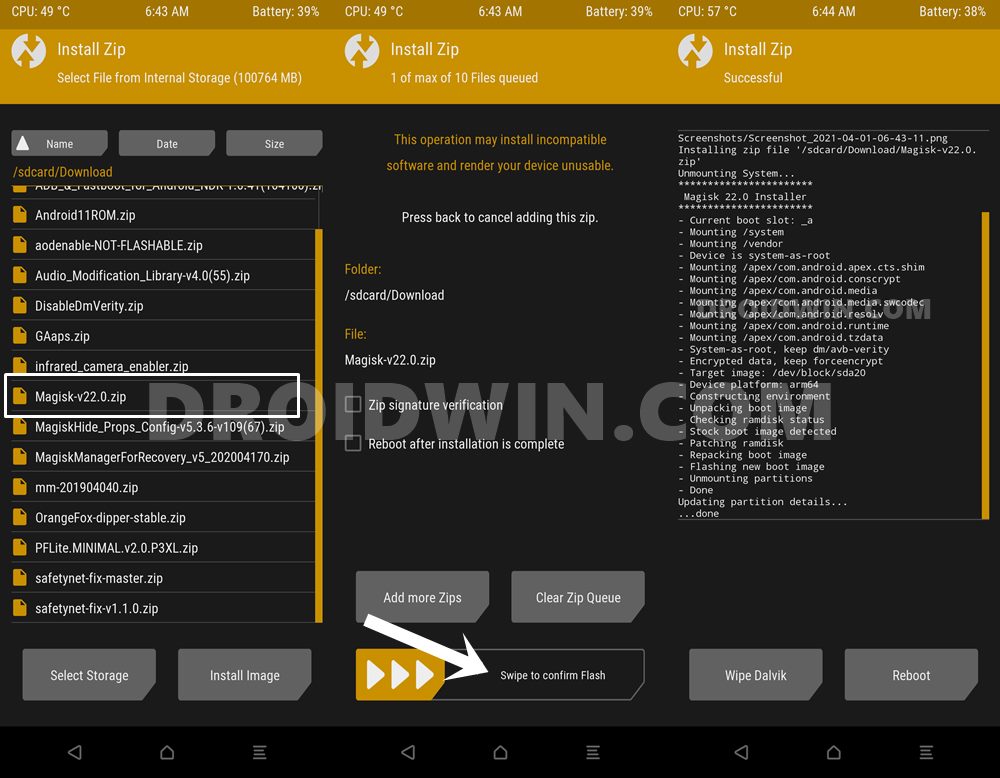
When it comes to rooting, you could flash the Magisk Installer ZIP via TWRP. But since it is no longer a ZIP and is rather an APK file, how could we flash it via TWRP? Well, here comes the interesting part. This APK is still a flashable ZIP. You just need to change its extension from APK to ZIP and then flash it via TWRP (see below screenshot). If you don’t yet have TWRP installed, then refer to our guide on How to Install TWRP Recovery on Android.
What about the other method of rooting without TWRP? In this, till now we used to patch the stock boot.img file via Magisk and then flash it via Fastboot. That still stands true, with Magisk v22.0 as well. Just download and install this new Magisk App and carry out the patching of the stock boot.img as before. To know more about that, please refer to our comprehensive guide: Patch Stock Boot Image via Magisk and Flash it using Fastboot.
How to Update to Magisk v22.0
So we have just discussed the steps to install Magisk to root your device. But what about when you already have rooted your device with an older build of Magisk such as v20.4? Well, in those cases, there’s not much that you need to do. Here are the required instructions to update your device to Magisk v22.0 (make sure you’re connected to the internet).
How to Uninstall Magisk Modules using TWRP RecoveryFix Magisk Module Bootloop without TWRP RecoveryHow to Flash magisk_patched.tar (patched Samsung AP file) via OdinRoot Android 11 via Magisk Patched boot.img (without TWRP)
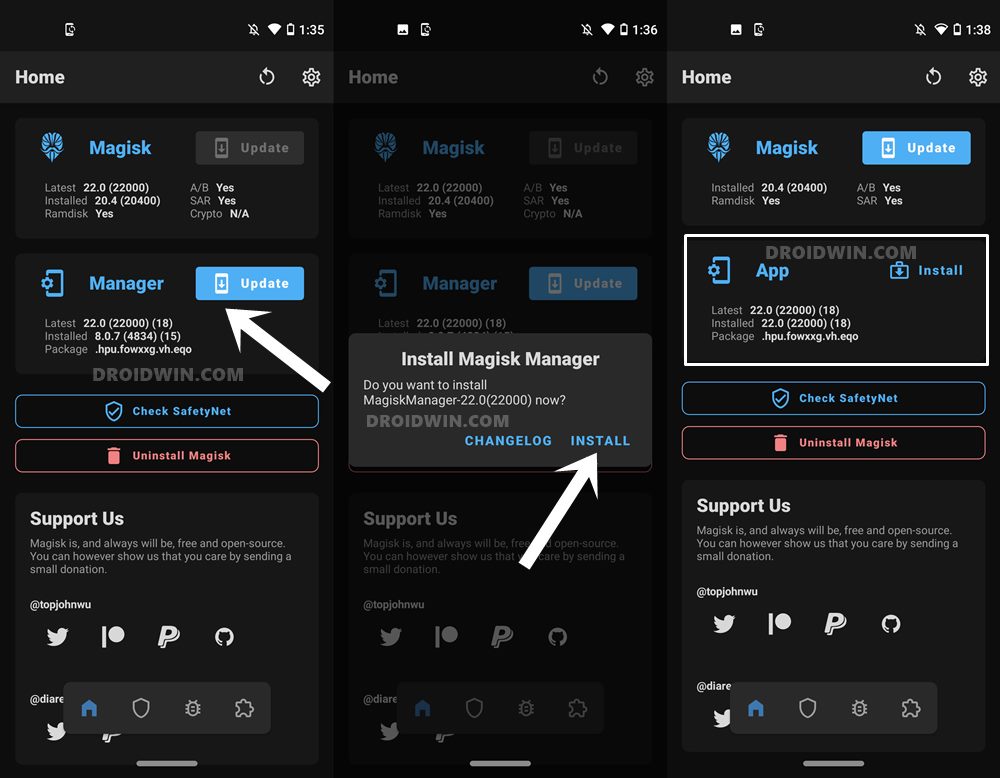
STEP 1: Update Magisk Manager to Manager App v22.0
With this, you have updated the Magisk Manager app, you should also see the Manager word now changed to App. Moving on, let’s now update the Magisk Installer ZIP as well.
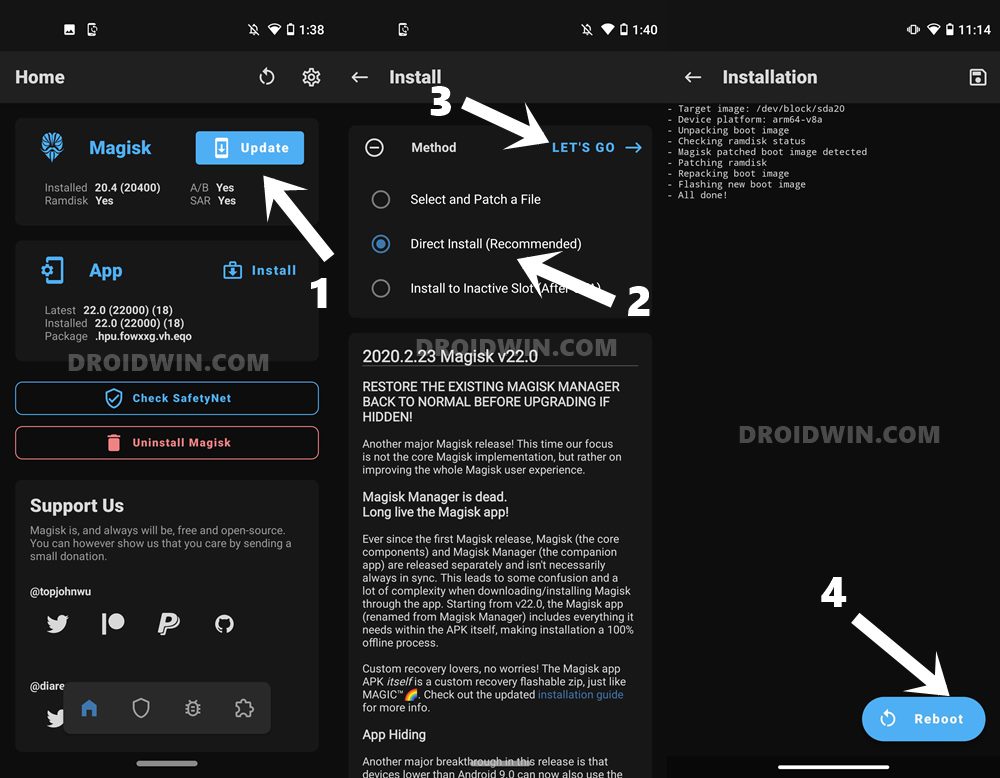
STEP 2: Update Magisk Installer ZIP to v22.0
If you have hidden the app or renamed it to a random name to hide root, then you will have to revert to the original build. In other words, please unhide Magisk and let it retain its original name. To do so, go to Settings and tap on Unhide the magisk App option [Once updated, you may again hide root via How to Pass Magisk SafetyNet on Rooted Android 11]. When that is done, proceed with the below steps:
That’s it. With this, we conclude the guide on how to download, install and update Magisk v22. If you have any queries concerning the aforementioned steps, do let us know in the comments section. We will get back to you with a solution at the earliest.
About Chief Editor


